Joining my high-school swim team is hands down the hardest thing I have ever done.
I had never been a very strong swimmer. I usually struggled to pass the summer camp swim test every year. I sort of knew breaststroke and freestyle but had only done them at a leisurely pace to swim around in the local pool. I never joined the swim team as a little kid and had never in my life swam in a pool with lanes. I had only learned how to dive a few years before I started on the swim team.
Having that said, somehow my friends on the swim team (who were all those kids who had been on the local swim team since they were 5) convinced me that it would be a ton of fun to join the team! They had me all gung-ho about trying this new competitive sport. It was the middle of my sophomore year. Classes weren't too challenging and I needed something to do. Hey, maybe it would keep me from getting fat over the holiday season!
Our team was pretty fantastic at the time I joined. We always won the local conference title by a land slide and had a lot of swimmers regularly advance to the state championship. As a whole, the team was FAST. I was not.
I remember my first practice pretty vividly. It was a nightmare. I was sort of guided by my friends into the so-called "slow-lane". It was the slowest group of swimmers on the team but it was still too fast for me. I distinctly remember the panicky feeling of drowning when my leg cramped up in the middle of the lane. I considered myself pretty athletic but I had never had a cramp like this before. I thought I was gonna die. Then I realized the lane pool is only 4 feet deep or so. So I hobbled to the end of the lane, sat on the side of the pool and massaged my cramping calf.
The next few practices were a blur of exhaustion, nausea, and chlorine but somehow I stuck with it. I slowly progressed as a swimmer over the three years that I swam for my high school team. I steadily trimmed a second or so off my 50-free time during each successive swim meet. I felt a little less nauseous after each practice. I started perfecting my stroke during practice and could get going in a steady pace. I was proud of myself even though I was still probably one of the slowest on the team.
My proudest accomplishment was my completion of a 500m freestyle event at a meet. If you don't swim, a 500m is like the marathon of swimming events. I sort of dared myself to do it and I told my coach I would do it if it meant it was the only event I had to swim at that meet. He agreed and I made my first attempt at practice jsut to see if I could even do a 500m all at once. It took me a long time but I finished a 500 in my own lane during practice while everyone else was doing the team workout. At the meet, I was pretty nervous. They had lumped all the male and female 500 swimmers together into one event. Not many people swim the 500. Usually just one or two from each team. I think this was probably because most teams only had one or two insane people who loved the feeling of burning pain in every muscle.
I got on the block and prayed to God that I didn't come last. The whistle blew and I dove in somewhat clumsily (I hadn't known how to dive very well until I started swim team) and started my event. I knew I had to set my pace slow or I'd burn out before I got halfway. I had a friend of mine counting laps for me. They ticked by agonizingly slow. It didn't take very long for the burning sensation to come over my whole body and I was struggling at 3/4 of the way done. I could see when I came of for gasping breaths that the other guys on my team had already finished. Great. I'm pretty sure the only reason I actually finished is because my team mates gathered around the end of my lane and started cheering me on. I could hear them yelling for me every time I came up for a breath. It really meant a lot to me and actually makes me tear up a little just writing this. I think the friendly people on the team is what kept me swimming for the last three years of high school. I hated swimming but I loved the people.
Anyway, I was limping down the lane for my last few laps and just giving it all my body had while most of my team was cheering for me. I had to finish now or my whole team would see me fail. So despite the pain, I somehow finished and I even beat one person! I didn't come last! ...never mind if it was a girl. I had so much spent myself that I actually couldn't press out of the pool. I had to have someone pull me out of the pool. I then flopped down into a puddle on the pool deck, gasping for air, not unlike a fish yanked up into a boat. I was exhausted but happy and immensely proud of myself.
I had never considered myself a very good swimmer, and still don't honestly, but I had a lot of fun on the swim team and I think it was mostly due to the awesome people who talked me into it and the easy going coaching style. So thanks to those who made one of the most exhausting times of my life also one of the happiest.
-Me, the Swimmer
Thursday, June 11, 2015
Tuesday, January 20, 2015
How To Make A Fireball
DISCLAIMER: Homemade fireworks of any kind are inherently dangerous. They could cause extreme injury or death. It is important that you understand the risks you are taking before following any of these instructions.
Fire is cool. Fireballs are cooler. Here's how to make a fireball with coffee creamer (the powdery kind, not the liquid).
Step 1: Acquire a Can

Fire is cool. Fireballs are cooler. Here's how to make a fireball with coffee creamer (the powdery kind, not the liquid).
| If you get everything just right, you may be able to achieve this. |
Step 1: Acquire a Can
Just a regular old steel can that your sliced peaches came in. If for some ungodly reason you don't have one, check your local hobo encampment and search for an empty can of beans.
 |
| steel can |
Step 2: Acquire Black Powder
My favorite way to do this is by deconstructing firecrackers. You just use pliers and squeeze the firecracker until the white packing material (looks like sand) starts falling out. This stuff is useless. Keep rolling the fire cracker in your fingers until the black powder starts to fall out. You need that. When the white sandy stuff starts falling out again, stop. Remove the fuse from the cardboard casing. You can get rid of everything except the black powder and the fuse.
Alternatively, you can buy black powder meant for muzzleloader rifles. You may have to be a certain age to do this and only certain stores actually stock it.
Step 3: Drill a Hole
Drill a hole in the side of the can, just barely above the bottom of the can. The hole should be as big around as your fuse (which you have from the firecracker you deconstructed).
Step 4: Create a Barrier
You're going to need a barrier to separate the black powder from the coffee creamer when they are both in the can. Trace the bottom of the can on some tissue paper and cut it out. It should fit into the can almost perfectly, probably just a tad too big.
Step 5: Dump in the Black Powder
The more, the better but you don't need a ton. If you have enough to cover the bottom of the can, you have plenty. It would be best to have a little pile in the middle of the can. I wouldn't use less than 1/4 tsp of backpacker. The more black powder you have, the more creamer you can put on top of it, and the bigger fireball you can have.
Step 6: Slide in the Fuse
It is very important that the fuse remains in contact with the black powder or else you are going to have a dud. Make sure you are careful during construction so that the powder will light when the time comes.
Step 7: Install the Barrier
Just slide the tissue paper disk all the way down to the bottom of the can and make sure it fits well. You don't want any holes or the creamer will mix with the black powder and it may not combust.
Step 8: Pour the Creamer
Again, make sure you are using POWDERED creamer. Alternatively, I hear powdered sugar or corn starch work well, but I have never personally tried either. I would only fill the can between a quarter and half way the first time to ensure success. Push the limits with each successive test and see how far you can go with your amount of black powder.
Step 9: Light it and Stand Back
If you did everything correctly and your black powder is viable, a rather large fireball should emanate from the can with a satisfying whoosh. Make sure you stand back or you'll loose your eyebrows.
-Me, The Pyrotechnic
Wednesday, January 14, 2015
Bike Accident
I used to bike a lot. Everyday after school during my 8th grade year, I would change into my cycling outfit and hit the trail. A 15 mile ride was pretty average. I wore glasses to protect my eyes from little gnats and stuff but I never wore a helmet to protect my head. I had a little bike computer that told me how fast I was going and how many miles I had covered. I used my dad's old 10 speed road bike so I could get going pretty quick, especially in this one part of the trail where there was a long downhill section. It was a nice bike, even if it was old: quick release front wheel, quick adjust bike seat, racing handlebars, etc.
It was a typical summer day before my freshman year in high school. It was just me and my younger brother home at the time. I told him I was going for a ride and I'd be back later. I hopped on my bike and headed out like I always did. Biking shorts, biking jersey, sunglasses, pass on the helmet. I headed out on my typical route. I was feeling good and picked up some pretty good speed on the downhill section this time. I had gotten my computer to peak at 30 mph at this section before but today I didn't dare look down at the computer screen. I saw some raised cracks coming up ahead of me. When the trees lining the trail got big, their roots would lift up the asphalt, forming little speed bumps and that's what I was looking at. I pulled up on the handlebars to get over them instead of riding right into them and experiencing a sharp jouncing. Unfortunately, when I pulled up, the front wheel didn't come with me. I guess I hadn't closed the quick release tight enough on the front wheel. When I came back down, the wheel axle didn't meet the fork right and the wheel seized up. My bike went from 30 to 0 but I didn't. I flipped over the handlebars....and that's where things start to get fuzzy.
I've had a few concussions in my life. Probably more than is healthy. But this experience was the most severe. I really don't remember getting home at all. I'm pretty sure I can remember pushing off the pavement and touching my face and then pulling away a bloody hand. The next thing I remember clearly was sitting on the floor in the downstairs guest bathroom. My younger brother was on the phone with someone. He seemed scared. He handed me the phone and told me it was my sister, who's an athletic trainer so she was trained to deal with concussions. She started asking questions to see how I was doing. I knew my name, that was easy, but when I couldn't remember my address or where my mom or dad were at the time I was getting scared. I knew that was bad.
"I want you to remember these words okay?"
"okay"
"duck, house, boot"
"duck, house, boot"
"yeah."
She kept talking and asking questions and after a couple minutes, asked me if I could remember those words she had just told me. I couldn't. I remember being pretty scared right then.
My older brother came home from work and came in to see what was going on. I was sitting in front of the toilet with my injured side facing away from the door. He asked if I was okay and I told him I fell off my bike.
"Well you look okay."
"Really?" I turned to look at him and then he saw my scraped up side.
"Holy crap!"
He then proceeded to whip out his phone and get a couple pictures of my fresh wounds. I hadn't looked in the mirror because my nausea was preventing me from standing up. My dad came home from work when he heard I had an accident and as soon as he saw my face and tried talking to me, he knew he needed to take me to the hospital. He helped me up and I stole a glance into the mirror. I looked bad and another wave of "oh shit" washed over me.
We got to the hospital with all of the contents of my stomach remaining in my stomach. I got admitted and received a cool bracelet with my name and some other stuff on it. I got some scans and some stitches in my face(the first of a couple times I've had stitches in my face). I had a pretty good gash in my right eyebrow where the lens of my sunglasses cut me. I was lucky it didn't go in me eye. They cleaned the asphalt out of my road rash and rubbed some ointment on all of my abrasions.
Recovery sucked because most of the right side of my face and neck was all scabby. I couldn't turn my head or the scabs on my neck would crack and bleed. I couldn't lay on my right side (my favorite side to lay on) because it hurt my face and it would leave the pillow all bloody and gross. The gauze bandages would stick and I'd start burning and bleeding all over again. Conveniently, I received my injuries right before the the trip to see all of my extended family. Every aunt and uncle and cousin got a chance to say "wow what happened?!" and "well you should've been wearing a helmet!" Lesson learned.
-Me, the Biker
 |
| A few days after my accident |
Monday, January 12, 2015
Failed Projects: Memoir
I have a lot of trouble with projects that I would categorize as "liberal arts" endeavors. For example, I love music and I am a pretty capable percussionist but when it comes to generating music of my own, I find it intensely difficult. Similarly, I enjoy a good story in the form of a book or a short story but when I try to write my own, I find it very challenging to come up with anything worth while.
My first attempt at writing was during my junior year. I borrowed an old-fashioned mechanical typewriter from my middle school computer teacher as sort of a novelty. I cleaned all the dust our of the lever arms and oiled it up so that it was running smooth. I even got a new ink ribbon for it so that everything was back in working order. Then I decided it would be funny to take it to school and take notes with it. My teachers didn't really appreciate the horrendous racket it produced and asked me to stop or get out within the first 3 minutes of class.
 |
| Mine looked something like this...but dustier. |
After a day of carrying the 30 pound metal typewriter around school, I decided I'd had my fun so now I should actually do something productive with it. I had played with the idea of starting a memoir before but had never really worked up the motivation to get some words down. I thought using the typewriter was fun so maybe I would enjoy typing up a memoir! I like the idea of chronicling my life so that I can look back when I'm 70 and say "holy crap I can't believe I did that" or "wow I was really stupid back then". I don't want to forget any of the cool stuff I did so a memoir seemed fitting.
Writing a book is a lot of work. I guess I didn't really appreciate that going into it. People spend years writing books but I thought I could bust out a working draft within a couple of weeks. Pretty much what happened is I sat down in front of the typewriter, got my paper ready and made sure the ink was working. Then stared at the page for 15 minutes. I decided to start with why I was writing the memoir and typed up some junk. I went back and read and realized how repetitive I sounded so I took it out, crumpled it up and threw it away. I'm not sure if I'm not really a good writer or if I'm just to critical of my own work but it took me all afternoon to get a measly two or three pages of content that I was satisfied with.
Once the novelty of the typewriter wore off and I was focusing more on content, I started loosing interest in the project. Sitting down and trying to write a chapter of material that was worth reading just seemed like to much work and more than I was willing to do. Typewriters are fun, trying to write a whole book in a few weeks was not. So I gave up and decided to revisit the project another time.
That's pretty much what this blog is I guess. I want to make note of the things I've done so far before I forget about them so that, at some point, I can look back and remember all of my experiences. Blogging is just a less formal way of doing it. In a book, I feel like I have to make the language formal and use ornate phrasing and write long chapters on every experience and get the grammar just right and use engaging literary devices and remember what my English teachers taught me about writing and avoid run-on sentences and avoid using words like junk and stuff and stuff like that. But that's hard.
So far my revisit to writing a memoir (blog version) seems to be going well. It's a lot easier to just write the way I would talk. I can make entries as long or short as I want depending on what the story I'm telling calls for. It's nice. I just hope this doesn't turn into a failed project too.
-Me, the Wannabe Author
Saturday, January 10, 2015
Failed Projects: Dugout Canoe
It was the end of my freshman year. I believe we were studying Native Americans in my History class and we had spent time talking about their techniques for building canoes. It is believed that they lit a fire at the base of a suitable tree and then chopped at the burnt tree with their primitive hatchets to remove material. They did this over and over until the tree fell down then they used a similar technique to shape the tree into a canoe. They essentially dug out (hence the name) the inside of the tree leaving a boat shell. This is what a successful one would look like:


I decided this looked like fun so after school I headed down to the petroleum pipeline that runs through my neighborhood. The pipeline is basically a long skinny field with mature forests on either side. I figured I could cut down a tree on the edge then drive down the field to pick it up. I didn't have an ax at the time, just a hatchet. I hid it in my pants on the way down so no one was suspicious. I convinced my younger brother to come with me to keep me company. There were few trees lining the pipeline that were really suitable. I ended up settling for a tulip poplar, which was really much too small to fit me but I overlooked that at the time I guess. It took me three afternoons to cut it down with my little hatchet. Towards the end, I got sick of swinging. I was pretty close to getting through the tree so I threw a rope around the tree and got it as high as I could. My brother and I both pulled as hard as we could until we heard the tree start to crack and give way....falling right towards us. We both darted out of the way. There's something really great about watching a tree fall. All the leaves provide a lot of air resistance and cause the tree to fall in slow motion. It creaks and snaps on the way down and when it finally touches down, the ground shakes with the impact. I would have felt bad about cutting down a nice healthy tree but tulip poplars grow like weeds and it doesn't take long (comparatively) for a tulip poplar to get big.
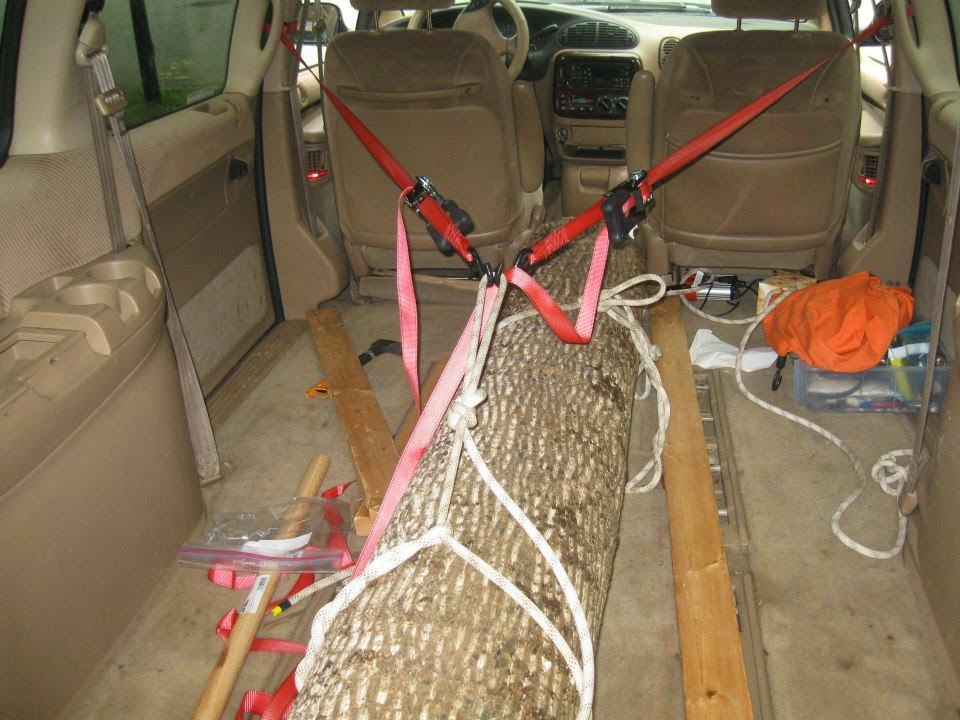
The next step was hacking off the branches and finding a section of the trunk that was nice and straight. Tulip poplars are usually nice and straight anyway so that was another reason I had picked it. I spent another couple afternoons hacking off a section with the hatchet. Now that I had my log, I had to get it home. I didn't have a truck so the next best option was my mom's '95 minivan. I couldn't drive it all the way down to where the tree was because I was afraid I would get it stuck so I had to pull the log about 100 yards up to the top of a hill where I could load it into the back of the van. I used some round sections of branches to put under the log which was pretty damn heavy because it was so green and wet. I tied my rope around the log and, with the help of my hesitant dad, pulled the log up the hill. We could only pull so far until the roller logs came out from under the back end of the tree and we had to put it back up in the front. I got this idea from the way the transported the massive stone heads on Easter Island. Finally, we got the log up to the back of the van. We managed to wrestle the end of the tree up onto the bumper and eventually got the whole log inside. I tied it in nice and tight so that it didn't fall out when I accelerated forward.
Unfortunately the log was a bit too long so we couldn't close the trunk. I'm sure anyone who happened to see us drive by was pretty confused. Whoops.
I used our old red flyer wagon and the frame of a little peddle go cart we had to wheel the log into our backyard. I started a little fire all along the tree with charcoal briquettes. It did surprisingly little. I was pretty discouraged at how little the fire even did to the log. I tried hacking a little trench down the length of the log with my hatchet and tried again with the fire. It did a little more this time but still not much. I gave up when I realized after all this work, the canoe was still going to be much to small for me.
I revisited the project a little later. I decided I needed a bigger log so I went exploring along a public trail near my house. I found a nice big fallen pin. It was massive. At least a yard in diameter. I went out, bought an ax, and returned to start chopping off a good section. I'm not sure how I thought I was going to get it home but I never got that far anyway. After about an hour or two of chopping, some random trail walker and his wife stopped to look at what I was doing. The man began yelling at me in a heavy German accent. He said something about me having a weapon in a public area or some nonsense like that and said he was going back to the park office to report me. He asked what my name was and I struggled to think of a good fake name. "uuuh Steven Smith." I doubt he believed me but he left anyway, headed toward the office. I walked the other way rather quickly and headed towards home. I was probably breaking some sort of law. This wasn't the last time I got caught doing some forestry by a disgruntled trail walker, but I think that's for another story.
-Me, the Wannabe Indian Shipwright
Failed Projects: Introduction
I estimate that for every 4 or 5 successful projects, I have 1 project that doesn't end up the way I had initially planned. Sometimes I realize half way through how impractical my goals are. Sometimes I get bored. Sometimes I run out of money. Sometimes I just get frustrated and throw all my work into a pile and light it on fire. Whatever the reason for failure, I always learn a lesson that helps my next project be more successful. Failed Projects will be all about, yeah you guessed it, my failed projects.
"Mistakes are the portals of discovery." - James Joyce
-Me, The Discoverer
"Mistakes are the portals of discovery." - James Joyce
-Me, The Discoverer
Friday, January 9, 2015
How to Make Plaster Castings
Occasionally I find myself needing an artistic outlet. I don't remember where I first saw this technique but I was amazed at how detailed plaster casts could be if you do them right. I like 3D art best (mainly because I'm rubbish at drawing) and I thought I would have a go at making the most life like sculpture I could with casting hands in plaster.
Step 1: Make a Mold
The mold is everything. For this project, I used the gel that the dentist uses to make a form of your teeth called alginate. You know that goopy stuff they put in a retainer shaped dish that they put in your mouth and ask you to bite down on for a few seconds. It gushes out and around your teeth and sets up then they take it out and have a perfect mold of your teeth. I asked my dentist if I could buy some alginate from them and as it turned out, they had some old stuff they would just give me for free! My dentist even helped me do the first hand casting at the office. Make sure you have a container that's big enough for your fist. Mix up the alginate according to the directions that are usually on the container it came in. Usually it's just a matter of adding the right amount of water and mixing it in sufficiently. I've been told that using cold water makes the alginate set up slower than if you used warm water. Once you have the alginate mixed up, you need to work quickly before it sets up. Ooze your hand into the weird puddingy mixture and hold it still in whatever position you want. Just remember, some positions may be more prone to air pockets when you pour the plaster.
TIP: I found it helpful to lube up my hand in Vaseline before putting it in the alginate. It helped me slide my hand out easier once the material set up. Also, it kept the alginate from grabbing the hair on my fingers and hand which would result in little chunks of the mold coming out on my hand. That would result in a imperfection in the cast.
Step 2: Pour the Plaster
I just used Plaster of Paris. I'm sure there are better plasters that are more dense and could capture more details but Plaster of Paris is cheap and readily available so that's what I used. Just mix it up according to the box directions (again usually just involves pouring in the right amount of water) and pour it in the mold. I wanted to mount my hands so I stuck a dowel into the top of the mold, however when the plaster sets up, it tends to shrink a little which caused my hands to crack around the dowel. I'm not sure what the best solution is for this but perhaps a narrower dowel (mine was about an inch in diameter) would prevent cracking. Or, if you were very careful, you may be able to drill into the hand once it is set and then glue a dowel into the hole.
Step 3: Let the Plaster Set
Patience is a virtue.
Step 4: Remove the Cast from the Alginate
This shouldn't be too hard. The alginate should peel right off for the most part. You might have to use a toothpick or something to pick the alginate out of some crevices but cleanup should be relatively easy. Take some time to marvel at the detail of the cast. You can see every little wrinkle of your knuckles and every line of your palm. You can even see the texture of your skin on the cast.
Step 5: Touch It Up
Even with the Vaseline, I had a few imperfections on my casts. There were a bunch of little bumps, kind of like braille writing. I just used a dremel tool to grind off the bumps but you loose some skin detail this way too. If you're feeling adventurous, you could use the dremel tool to carve designs into your hands. I did this with one hand to make it look like you could see the skeletal structure.
Step 6: Paint Them (Optional)
I decide to paint my hands because I wanted to use them as coat hooks and if I didn't paint them, i would get plaster dust all over my jackets. You definitely loose some of the more delicate details this way, but it protects the plaster from abrasion. If you want the best of both worlds, you could probably just give them a couple coats of clear spray paint.
Here are my hands:


-Me, the Sculptor
Step 1: Make a Mold
The mold is everything. For this project, I used the gel that the dentist uses to make a form of your teeth called alginate. You know that goopy stuff they put in a retainer shaped dish that they put in your mouth and ask you to bite down on for a few seconds. It gushes out and around your teeth and sets up then they take it out and have a perfect mold of your teeth. I asked my dentist if I could buy some alginate from them and as it turned out, they had some old stuff they would just give me for free! My dentist even helped me do the first hand casting at the office. Make sure you have a container that's big enough for your fist. Mix up the alginate according to the directions that are usually on the container it came in. Usually it's just a matter of adding the right amount of water and mixing it in sufficiently. I've been told that using cold water makes the alginate set up slower than if you used warm water. Once you have the alginate mixed up, you need to work quickly before it sets up. Ooze your hand into the weird puddingy mixture and hold it still in whatever position you want. Just remember, some positions may be more prone to air pockets when you pour the plaster.
TIP: I found it helpful to lube up my hand in Vaseline before putting it in the alginate. It helped me slide my hand out easier once the material set up. Also, it kept the alginate from grabbing the hair on my fingers and hand which would result in little chunks of the mold coming out on my hand. That would result in a imperfection in the cast.
Step 2: Pour the Plaster
I just used Plaster of Paris. I'm sure there are better plasters that are more dense and could capture more details but Plaster of Paris is cheap and readily available so that's what I used. Just mix it up according to the box directions (again usually just involves pouring in the right amount of water) and pour it in the mold. I wanted to mount my hands so I stuck a dowel into the top of the mold, however when the plaster sets up, it tends to shrink a little which caused my hands to crack around the dowel. I'm not sure what the best solution is for this but perhaps a narrower dowel (mine was about an inch in diameter) would prevent cracking. Or, if you were very careful, you may be able to drill into the hand once it is set and then glue a dowel into the hole.
Step 3: Let the Plaster Set
Patience is a virtue.
Step 4: Remove the Cast from the Alginate
This shouldn't be too hard. The alginate should peel right off for the most part. You might have to use a toothpick or something to pick the alginate out of some crevices but cleanup should be relatively easy. Take some time to marvel at the detail of the cast. You can see every little wrinkle of your knuckles and every line of your palm. You can even see the texture of your skin on the cast.
Step 5: Touch It Up
Even with the Vaseline, I had a few imperfections on my casts. There were a bunch of little bumps, kind of like braille writing. I just used a dremel tool to grind off the bumps but you loose some skin detail this way too. If you're feeling adventurous, you could use the dremel tool to carve designs into your hands. I did this with one hand to make it look like you could see the skeletal structure.
Step 6: Paint Them (Optional)
I decide to paint my hands because I wanted to use them as coat hooks and if I didn't paint them, i would get plaster dust all over my jackets. You definitely loose some of the more delicate details this way, but it protects the plaster from abrasion. If you want the best of both worlds, you could probably just give them a couple coats of clear spray paint.
Here are my hands:
-Me, the Sculptor
The Philmont Files: Waffles
No not the tasty breakfast item. Waffles was a donkey. Actually I guess he was technically a burro, but he was stubborn as a mule. Those might all be the same thing, I don't really know. We teamed up with Waffles about half way through our trek. His job was to carry part of our load and we had been looking forward to getting to use the burro for just this purpose. We soon came to find out that he wasn't worth the trouble. Waffles would randomly stop walking on the trail and would only get going again with the insistence of a sharp poke on the ass with a trekking pole. All he was allowed to carry was our food, and not even all of it. We probably only lost a pound or two from each of our packs. We had to load him up every morning and unpack him every night. Whenever we stopped for a break, someone had to be assigned to hold his bridle or else he would just walk away. That was the worst. After hiking with 40 pounds on your back for 5 hours, all you want to do is sit down and eat your lunch, but for a couple days, some unlucky bastard had to hold Waffles' bridle and watch everybody else eat until they were relieved. Luckily I had been elected the leader of our group so I got to assign who that was. Hehe. One peculiar thing about Waffles was whenever you rubbed his nose, he would immediately start to get an erection which we all found rather odd...and amusing. Waffles was frustrating but we missed him nonetheless when we parted ways. He had a personality about him that made him one of the crew and I think we were happy to get rid of him, but still felt like part of the group was missing the day after we left him behind.
-Me, The Backpacker
 |
| Waffles and I |
 |
| Daaaw what a cutie |
 |
| One of the crew |
-Me, The Backpacker
The Philmont Files: Introduction
I've been an avid backpacker since middle school and an outdoorsman for even longer. I have spent countless weekends on the Appalachian Trail and loved every minute of it. With every trip comes a new story. Something about backpacking is addictive for me and I always feel better after a night or two away from civilization. It does me well to just forget about the stresses that plague me in the real world and just escape for a couple days.
My backpacking career reached its climax the summer after my Freshman year in high school when I spent two weeks on a trip in the back country of New Mexico with ten other guys. This reserve in New Mexico is known as Philmont and it serves as a kind of Mecca for backpackers in boy scouts (yes I was a boy scout. I even got my eagle!). Backpacking trips always had an anti-depressant effect on me but this trip was much more than that and I believe that my trip to Philmont is one of the most important experiences of my life so far.
As you could probably imagine, a lot can happen in two weeks. I have so many memories that I could probably write a book on the experience but because this is a blog, I decided to break up all the stories into their own individual blog posts. So without further ado: the Philmont Files.
-Me, The Backpacker
My backpacking career reached its climax the summer after my Freshman year in high school when I spent two weeks on a trip in the back country of New Mexico with ten other guys. This reserve in New Mexico is known as Philmont and it serves as a kind of Mecca for backpackers in boy scouts (yes I was a boy scout. I even got my eagle!). Backpacking trips always had an anti-depressant effect on me but this trip was much more than that and I believe that my trip to Philmont is one of the most important experiences of my life so far.
As you could probably imagine, a lot can happen in two weeks. I have so many memories that I could probably write a book on the experience but because this is a blog, I decided to break up all the stories into their own individual blog posts. So without further ado: the Philmont Files.
 |
| I climbed a tree |
-Me, The Backpacker
Thursday, January 8, 2015
Confirmation
I had a private, Catholic education from kindergarten to my senior year of high school (by my mom's insistence). I think the constant forcing of religion onto my life sort of explains my lack of faith when it comes to Catholicism. I was forced to take a religion class every year for 12 years. I appreciate that I was privileged to get the education I did, and I have nothing against (most) of my teachers, but the more I was forced to study the Catholic church, the more I realized it just wasn't for me. I came to this conclusion in the 8th grade which happened to be the same year that all of my peers and I were scheduled to be Confirmed, a flowery ceremony where young adults declare their faith in the beliefs of the Catholic church.
I knew I couldn't let myself go along with everyone else to be Confirmed because it would be a lie to my friends, my teachers, my family, and most importantly, myself. I was a baptized Catholic (again by my mom's doing) and had participated in all the customary rituals without question for a long time but I never really had a say in the matter until Confirmation. It was the first time I had any real input in my faith life.
The first person I went to was my English teacher. She had this sort of wise and understanding aura about her and she seemed like the best person to go to. I couldn't go to my mom because she was biased in the matter and I couldn't go to my dad because, even though I think he has similar religious opinions, he tends not to share them and probably would have brought my mom into it. I felt like I couldn't go to any of my religion teachers because, instead of being listened to, I would have been either A) reprimanded or B) gently pushed back into line and set on my way to get Confirmed regardless of my doubts. So that left Mrs. Saintsing. I am still grateful to this day for her guidance.
My mom is firm in her faith but the rest of my family is, to varying degrees, against the Catholic church. My mom wasn't happy when I told her I didn't want to get Confirmed but I think she understood where I was coming from. That didn't keep her from arguing the point however. With the help of my older siblings, I was able to convince my mom that maybe the Catholic church wasn't for me. I remember very clearly my sister telling me that she was proud of me for thinking for myself.
The next step was convincing my religion teacher that I wasn't going to be getting confirmed. I spent a lot of time writing the perfect email, mainly because I was too cowardly to confront her but also because it gave me the ability to pick what I thought would be the most convincing words to persuade my teacher. This is what I wrote:
I regret that I couldn't have told you this face-to-face, but with you having parking lot duty all this week I could never get a hold of you after school to talk. Also, with the blessing of the candidates coming up this Sunday I needed to let you know before the end of the week that I don't want to or plan to get Confirmed this year.
If we had been talking face-to-face, this is probably when you would ask me "Why not?" and I would tell you that its because I don't believe that what the Catholic Church teaches is true. If I want to honor a God (which I'm not sure even exists at this point and time of my life) I shouldn't be told how to go about doing so. Perhaps that means I'm against organized religion. Also, I don't believe that Jesus was the "Son of God". I just can't bring myself to believe something that has no concrete foundation of fact or reason. There are a lot of things that require an almost blind faith-something I don't have.
If this is my "crisis of faith" as you put it in yesterday's religion class then so be it, but I can't and won't let myself be confirmed into a faith that I don't believe is true at this time of my life. If later on down the road I accept the teachings of the Catholic Faith then I can get confirmed then when I am certain that's what I want to do. Right now I can't be Confirmed into a faith I don't full-heartedly believe in for it would be a lie to my family, my friends, all those who are close to me, and most importantly, myself-and that is unacceptable.
Confirmation is the first real say in what I want to do with my religious life and only I can make the decision of what I do and don't believe. Don't think that this is some sort of snap decision because I've been thinking about this serious matter for the better part of a year and am absolutely certain this is the choice I want to make.
I hope this doesn't make the rest of the year any harder for you or me. If you feel like we still need to talk about this then I am fine with us talking but if your goal to to convince me to be Confirmed this year I'm afraid my mind is made up and there's no changing it. This is not to say that I will never in my life be confirmed or believe differently than what I do currently, but it does mean that this year I will not become a full active member of a faith that I don't believe.
I hope you understand.
-Me, The Unbeliever
I knew I couldn't let myself go along with everyone else to be Confirmed because it would be a lie to my friends, my teachers, my family, and most importantly, myself. I was a baptized Catholic (again by my mom's doing) and had participated in all the customary rituals without question for a long time but I never really had a say in the matter until Confirmation. It was the first time I had any real input in my faith life.
The first person I went to was my English teacher. She had this sort of wise and understanding aura about her and she seemed like the best person to go to. I couldn't go to my mom because she was biased in the matter and I couldn't go to my dad because, even though I think he has similar religious opinions, he tends not to share them and probably would have brought my mom into it. I felt like I couldn't go to any of my religion teachers because, instead of being listened to, I would have been either A) reprimanded or B) gently pushed back into line and set on my way to get Confirmed regardless of my doubts. So that left Mrs. Saintsing. I am still grateful to this day for her guidance.
My mom is firm in her faith but the rest of my family is, to varying degrees, against the Catholic church. My mom wasn't happy when I told her I didn't want to get Confirmed but I think she understood where I was coming from. That didn't keep her from arguing the point however. With the help of my older siblings, I was able to convince my mom that maybe the Catholic church wasn't for me. I remember very clearly my sister telling me that she was proud of me for thinking for myself.
The next step was convincing my religion teacher that I wasn't going to be getting confirmed. I spent a lot of time writing the perfect email, mainly because I was too cowardly to confront her but also because it gave me the ability to pick what I thought would be the most convincing words to persuade my teacher. This is what I wrote:
Dear Mrs. Wilkins,
I regret that I couldn't have told you this face-to-face, but with you having parking lot duty all this week I could never get a hold of you after school to talk. Also, with the blessing of the candidates coming up this Sunday I needed to let you know before the end of the week that I don't want to or plan to get Confirmed this year.
If we had been talking face-to-face, this is probably when you would ask me "Why not?" and I would tell you that its because I don't believe that what the Catholic Church teaches is true. If I want to honor a God (which I'm not sure even exists at this point and time of my life) I shouldn't be told how to go about doing so. Perhaps that means I'm against organized religion. Also, I don't believe that Jesus was the "Son of God". I just can't bring myself to believe something that has no concrete foundation of fact or reason. There are a lot of things that require an almost blind faith-something I don't have.
If this is my "crisis of faith" as you put it in yesterday's religion class then so be it, but I can't and won't let myself be confirmed into a faith that I don't believe is true at this time of my life. If later on down the road I accept the teachings of the Catholic Faith then I can get confirmed then when I am certain that's what I want to do. Right now I can't be Confirmed into a faith I don't full-heartedly believe in for it would be a lie to my family, my friends, all those who are close to me, and most importantly, myself-and that is unacceptable.
Confirmation is the first real say in what I want to do with my religious life and only I can make the decision of what I do and don't believe. Don't think that this is some sort of snap decision because I've been thinking about this serious matter for the better part of a year and am absolutely certain this is the choice I want to make.
Even though it is my choice, I still felt that I should share my plans with my parents and I have already talked with both of them making clear my intentions and they approve-not that they like the idea of me not getting confirmed, but that its my choice to make.
I hope this doesn't make the rest of the year any harder for you or me. If you feel like we still need to talk about this then I am fine with us talking but if your goal to to convince me to be Confirmed this year I'm afraid my mind is made up and there's no changing it. This is not to say that I will never in my life be confirmed or believe differently than what I do currently, but it does mean that this year I will not become a full active member of a faith that I don't believe.
I hope you understand.
-Me, The Unbeliever
Tuesday, January 6, 2015
How to Make a Dry Ice Bomb
DISCLAIMER: Homemade fireworks of any kind are inherently dangerous. They could cause extreme injury or death. It is important that you understand the risks you are taking before following any of these instructions.
New Years wasn't too long ago and nothing makes me happier than to ring in the New Year with explosives. Store bought fireworks are great but there's a certain satisfaction that comes from making your own pyrotechnics. Usually I would harvest the black powder out of cheap fireworks to use in explosives of my own design, but this year I didn't have the resources to do that. I had to improvise. I had heard of dry ice bombs, but I had never actually tried to make one. Turns out it's easier than I thought.
Step 1: Acquire an Empty 2-Liter Bottle
A 16 oz water bottle works too if you want a less aggressive explosion.
Step 2: Add Dry Ice Chunks
Actually getting dry ice is the hard part. My grocery store sells it for 99 cents per pound. A pound is more than enough. Some states require you to be at least 18 years old to purchase dry ice.
Step 3: Fill bottle about 1/4 With Warm Water
Warm water makes the dry ice sublimate faster
Step 4: Squeeze the Bottle a Bit and Cap It
Squeezing the bottle before you cap it acts as a fuse. The carbon dioxide gas has to fill up that much more of the bottle before it can explode and this gives you time to run.
Step 5: Run Away
Run. Far. Away.
Step 6: Ready Your Bowels
It would be a shame if you shit yourself . A 2-liter bomb is comparable to a gunshot so be prepared. It doesn't go off right away so there is plenty of time for the suspense to build.
Step 7: Enjoy and Repeat
Just don't blow your hands off.
.jpg) |
| What's left after the explosion |
-Me, The Pyrotechnic
How to Renovate a Sailboat
I found Polly on craigslist. I was looking for a Sunfish because I was pretty familiar with them after teaching a class on small-boat sailing. Sunfish are pretty common and it is easy to find replacement parts. There are tons of forums for sunfish owners as well and I found it easy to search preexisting advice on common repairs.
Polly was definitely a fixer-upper but I was looking for a project. I think as a rule of thumb, for every repair you know you'll have to make when you are first looking at a boat, there's probably another one that you can't see.
I decided to skip a day of school to take the six hour trip in my mom's '95 minivan to the coast where I could pick up Polly from some crusty old dude. He had a backyard full of interesting stuff he was trying to get rid of. I believe I remember seeing a Porsche mixed in among old dressers and busted go-karts. It was an interesting mix of treasures. This guy was nice enough to help me get Polly up onto the roof rack of the van and help me strap it down. I got her home in one piece and couldn't help but rig her up and see what she needed work on.
 |
| First time rigging her up in the front yard the same day I got her home. |
Step 2: Figure Out What Needs Fixing
Polly used to be a race boat and had definitely seen some time in the ocean because she had some serious corrosion everywhere. I unscrewed all of the corroded deck hardware. Some could be polished up but a lot of it was going to have to be replaced. The sail was pretty dry rotted with plenty of holes and rips that would have to be patched. the deck paint rubbed off as a powder where you touched it. There were pretty big dents and cracks in the fiberglass hull that would need repairing. The last owner had done a pretty bad job of trying to patch what turned out to be a pretty bad gash in the keel. The gel coat was rubbing off just like the deck paint. There was no daggerboard or rudder assembly. The rudder hardware that was on the boat was for the old style rudder that isn't made anymore which told me that she was from before 1972, so she was at least 42 years old when I got her. The sheet and halyard were both pretty dry-rotted and would need to be replaced.
Step 3: Tackle One Repair at a Time
I started with what I thought would be the most time consuming. SANDING. I decided that it would be better to remove all the paint and start over from scratch than to try to paint over a crappy base. I went out and bought an orbital sander and some 60 grit sandpaper. It took forever but I still think it was worth it. After i sanded everything down to the bare material, I used JB Weld to patch all the holes. I'm very sure this is frowned upon by most sailors but it seemed to work great!
 |
| Beginning of sanding |
Paint had to be done over several days. I could only do one thin coat per day. I found mixed opinions on what paint to use but I settled on using two different colors of Rust-Oleum Topside paint. I wouldn't have used this on the hull if she has being stored on the water, but I think it was okay for a daysailer. I sanded with a relatively fine grit by hand (the orbital sander was a bit too aggressive) between each coat as recommended and thinned the paint before each application as directed on the can. I used a high density foam roller then went back with a foam brush to knock out any bubbles. You can find pretty comprehensive videos of the "roll and tip" method on youtube. It was kind of amazing how much better Polly looked after each new coat of paint. I think I ended up doing 4 coats on the hull and 4 on the deck.
 |
| Before any paint, after sanding |
 |
| Deck immediately after last coat |
 |
| Final hull coat |
I cut some inspection ports right in front of the daggerboard slot and in the stern so that I could access the inside for mounting various hardware. I thought it was important to make sure there was an aluminum backer plate for any deck hardware so that nothing ripped out of the relatively soft fiberglass deck. I never put the coaming back on because it was so broken and decided I didn't really need one. I got the new rudder attachment mounted and riveted on the cleaned aluminum trim around the edge of the boat. I had finished all the renovations but I hit a wall when I had to purchase a brand new daggerboard, rudder assembly and tiller arm. These last few parts cost several hundred dollars and it took some time before I had enough extra money to spend on them. It killed me a little knowing Polly was all ready to sail but I couldn't take her out until I had the last few pieces.
Step 4: Name Her
I'm pretty sure it's bad luck if you don't. I got Polly's name from a song that was stuck in my head while I working on her. Its not uncommon to name your boat after a female acquaintance like your significant other or your mom or something. Just make sure you name her before you take her out for the first time or she'll be sure to get struck by lightening or run into a hurricane.
Step 5: Test Her Out
This is definitely the most exciting part. You get to find out if the patches are going to hold and if the sail is going to rip and if the name you gave her was good enough to keep her from getting struck by lightening. Everything you worked for and spent money on comes to a climax at this point. I took Polly out on a pretty calm lake near my house the first time just to make sure she could float without too much stress.
Polly performed well and there was no detectable water leakage into the hull so I took that as a thumbs up for taking her into rougher waters. I had never sailed in the ocean before but I had to get Polly back to the coast from whence she came and take her out on the Atlantic. The first day I got her down to the beach and got her rigged up, I realized it was too windy to sail. The weather was on the verge of a storm and after some convincing from my family, I decided it would be best to take her out when things had calmed down. The next day, it was still pretty windy but a bit less severe. I was a little scared to take her out but figured I had enough experience to manage. Someone must have been looking out for me because a random stranger approached us and asked me about what I was up to. He was probably mid-50's and informed me that he had a good amount of sailing experience in Sunfish on the ocean. He was wary to go with me when he found out I had no experience on the ocean but after some convincing (mostly him convincing himself) he agreed to go out with me. He basically took the reins and sailed Polly for me but it was a wild ride. Water rushed into the footwell because I didn't have the coaming on the deck to deflect the waves that were crashing over the bow. The atuobailer that would usually evacuate the water was corroded shut so we were slowly filling up with water. Therefore, it became my job to use the water pump I brought to get the water out as quickly as I could. We were moving faster than I had ever gone in a sailboat and the waves were pounding pretty hard against the sides of the boat. I had to lean out of the boat more than once to keep us from flipping over, which would mean destruction for Polly. It was terrifyingly exciting. Eventually we came in when my stranger friend ran out of nerves. It wasn't until we dragged Polly up onto the beach (scraping up her brand new red paint job) that we saw the sail was hanging on by a few threads top the tip of the boom arm. If it had torn all the way, the sail would have just flapped around in the breeze and Polly would have been stuck at sea. Between the total stranger becoming my captain and the patched and rotten sail barely holding on, I felt like a pretty lucky guy.
I'm pretty sure it's bad luck if you don't. I got Polly's name from a song that was stuck in my head while I working on her. Its not uncommon to name your boat after a female acquaintance like your significant other or your mom or something. Just make sure you name her before you take her out for the first time or she'll be sure to get struck by lightening or run into a hurricane.
Step 5: Test Her Out
This is definitely the most exciting part. You get to find out if the patches are going to hold and if the sail is going to rip and if the name you gave her was good enough to keep her from getting struck by lightening. Everything you worked for and spent money on comes to a climax at this point. I took Polly out on a pretty calm lake near my house the first time just to make sure she could float without too much stress.
 |
| Polly, Her, and I on Polly's maiden voyage |
Polly performed well and there was no detectable water leakage into the hull so I took that as a thumbs up for taking her into rougher waters. I had never sailed in the ocean before but I had to get Polly back to the coast from whence she came and take her out on the Atlantic. The first day I got her down to the beach and got her rigged up, I realized it was too windy to sail. The weather was on the verge of a storm and after some convincing from my family, I decided it would be best to take her out when things had calmed down. The next day, it was still pretty windy but a bit less severe. I was a little scared to take her out but figured I had enough experience to manage. Someone must have been looking out for me because a random stranger approached us and asked me about what I was up to. He was probably mid-50's and informed me that he had a good amount of sailing experience in Sunfish on the ocean. He was wary to go with me when he found out I had no experience on the ocean but after some convincing (mostly him convincing himself) he agreed to go out with me. He basically took the reins and sailed Polly for me but it was a wild ride. Water rushed into the footwell because I didn't have the coaming on the deck to deflect the waves that were crashing over the bow. The atuobailer that would usually evacuate the water was corroded shut so we were slowly filling up with water. Therefore, it became my job to use the water pump I brought to get the water out as quickly as I could. We were moving faster than I had ever gone in a sailboat and the waves were pounding pretty hard against the sides of the boat. I had to lean out of the boat more than once to keep us from flipping over, which would mean destruction for Polly. It was terrifyingly exciting. Eventually we came in when my stranger friend ran out of nerves. It wasn't until we dragged Polly up onto the beach (scraping up her brand new red paint job) that we saw the sail was hanging on by a few threads top the tip of the boom arm. If it had torn all the way, the sail would have just flapped around in the breeze and Polly would have been stuck at sea. Between the total stranger becoming my captain and the patched and rotten sail barely holding on, I felt like a pretty lucky guy.
 |
| Polly's real test with me and a stranger at the rudder |
-Me, The Sailor
Subscribe to:
Posts (Atom)